VoIP Phones Frequently Asked Questions
VoIP Phones FAQs
Question 1) How do I eliminate ghost calls on my Yealink T48G phone?
Answer) If you are unsure what ghost calls are, you can click the link below to read about it in more detail:
Why does my phone ring but there's no one there & I can't see the number in my dashboard?
In order to eliminate ghost calls from your Yealink T48G, you will need to access your Yealink's IP address. If you don't know how to find your Yealink's IP address, you can follow these links for help:
Advanced IP scanner for Windows
Once you have found your Yealink's IP address, enter it into a new browser window and log in. The default username and password is admin.
After you have logged in, navigate to Features and then click the General Information tab. Halfway down the page you will see a 'Accept SIP trust server only' option. Enable it and then click Confirm. Your phone will now no longer receive ghost calls!
Note: With some Yealink firmware (mostly V73 and v80), you'll need to disable IP calls. You can do this by going into the web configuration > Features > General Information tab and setting the allow IP call value to “disabled". Click the confirm button to accept the change.
If you need any further help today, please don't hesitate to contact our friendly support team on +443300437543 or by email!
Question 2) How do I enable call forwarding on my device?
Answer) Cisco phones:
You can set a call forward via your Cisco phone by pressing the Settings button and head to the Call Forward option. You’ll then have a few options, a forward for all numbers, a forward for is your number is busy and an option for a forward for no answer. On any of these options you can press the edit button and enter your number you would like to forward to here and then press Save.
Alternatively, you can set a call forward by going into the web configuration utility for your Cisco and then heading to Voice > User and then enter your number(s) under the Call Forward section of the page. Make sure that ‘Cfwd Setting’ is set to ‘Yes’.
Yealink:
To enable call forward in phone mode:
- Tap the Menu icon, > Call Features > Call Forward or press the transfer button when the phone is idle.
- Tap the desired forwarding type
- Depending on your selection:
If you tap Always Forward:
- Tap the On radio box of the Always Forward field.
- Enter the destination number you want to forward all incoming calls to in Call Forward To field.
- (Optional.) Enter the always forward on code or off code respectively in the On Code or Off Code field.
If you tap Busy Forward:
- Tap the On radio box of the Busy Forward field.
- Enter the destination number you want to forward incoming calls to when the phone is busy in the Forward To field.
- (Optional.) Enter the busy forward on code or off code respectively in the On Code or Off Code field.
If you tap No Answer Forward:
- Tap the On radio box of the No Answer Forward field.
- Enter the destination number you want to forward unanswered incoming calls to in the Forward To field.
- Tap the grey box of the After Ring Time field.
- Tap the desired ring time to wait before forwarding from the pull-down list. The default ring time is 12 seconds.
Alternatively, you can set a call forward by going into the web configuration utility for your Yealink and then heading to Features > Forward&DND. Here, change the phone mode to Custom and you would enter your forwarding number in the ‘Target’ field for 'Always Forward', 'Busy Forward' and 'No Answer Forward’. Be sure to change the setting to ‘On’ for each forward you have a number entered for.
Having the Mode set to Phone will set the call forwarding settings to be applicable for that particular account on the Yealink, whereas setting it to Custom will automatically configure that call forwarding number for all accounts of that Yealink phone.
Grandstream
You can set a call forward via your Grandstream phone by pressing Menu > Phone > Call Features > Choose Sip Account > Forward All. From here, you would enter the number you would like all calls to be forwarded to.
This is also true with softphones as seen below!:
Bria
In Bria, you set the call forward option by going into your SIP Account settings > Voicemail > Forwarding > Forward to…
Underneath you’ll also see a ‘forward when busy’ field and check box, which in essence is ‘forward when busy’ option you’ll see in other devices and softphones.
If you need any further help today, please don't hesitate to contact our friendly support team on +443300437543 or by email!
Question 3) How do I enable short codes on a Grandstream or Cisco VoIP device?
Answer) To be able to use any Expediusly Short Codes - for example, *50 to record audio - you will need to get into the Grandstream interface by entering your phone’s IP address into your browser. To do this, follow this link to get instructions on software that will help you find your phone's IP address:
Advanced IP Scanner for Windows
Your default username and password are both admin.
Once you’re in the interface, you'll need to go into Accounts > Account 1 > Call Settings. You will then see an option labeled Enable Local Call Features- Change this to No, and then Save and Apply.
The settings are located in a different place on other Grandstreams, such as the GXP 2130, and can be found under Accounts > Account 1 > Feature Codes. You will then see an option labelled Enable Local Call Features - Change this to No, and then Save and Apply.
You can view our more detailed FAQ for Grandstream phones!
How to enable short codes on a Cisco phone
To enable shorts codes on a Cisco, there is no setting as such. Instead, you'll need to head into the web configuration device of your Cisco and make sure you logged in as Administrator and have selected the 'Advanced setting' in the top right. After you have done that, head to 'Ext 1' and scroll down until you see the 'Dial Plan' option. Here, the entirety of your dial plan must read as follows: *(xxx.|[3469]11|0|00|[2-9]xxxxxx|1xxx[2-9]xxxxxxS0|xxxxxxxxxxxx**. You can have other dial plans after the "|" symbol, or you can leave the dial plan as the aforementioned one. If you are unsure what a dial plan is, we have an FAQ on it which you can find here: What is a dial plan?
If you need any further help today, please don't hesitate to contact our friendly support team on +443300437543 or by email!
Question 4) How do I make my call route display on my Grandstream when my phone rings?
Answer) You'll just need to enter your phone’s I.P. address in your browser to access the interface. The default
-
- Enter your phone’s I.P. address in your browser to access the interface
-
- The username is admin and the password is admin
-
- At the top of the page, rollover ACCOUNTS and select Account 1
-
- On the left-hand side, expand SIP Settings and click on Basic Settings
-
- Near the bottom of the page next to Caller ID Display change it to From Header
-
- Click Save and Apply
All done! Now your call route will be displayed when you receive a call!
If you need any further help today, please don't hesitate to contact our friendly support team on +443300437543 or by email!
Question 5) How do I make my message waiting indicator (MWI) flash when I receive a voicemail on my hardware phone?
Answer) It's super easy!
As long as you have voicemail configured in your phone's settings then it should work perfectly!
You don't need to do anything special to make it come to life, other than making sure your handset knows how to access your voicemail. In most hardware phones, voicemail access numbers are set per "User/SIP" account and whilst the location of the setting differs from phone to phone, they are normally really easy to find.
The easiest way to administer any hardware phone is by using a web browser. They all come with web admin interfaces that are a lot easier to use than struggling with the small phone screen and limited buttons. Just determine your phone's IP Address and log in to it using a computer that's on the same network by typing that IP into a web browser.
We set your default voicemail access number to 8000, so unless you've changed it in your Dashboard (Dashboard > My VoIP > Voicemail), then this is the number you need to pop in and save to bring your phone's voicemail functions to life.
One very important note is that we don't enable voicemail on a User account by default, so make sure you turn on your voicemail by changing that at Dashboard > My VoIP > Users and editing the relevant user account or you'll certainly never get any messages!
If you need any further help today, please don't hesitate to contact our friendly support team on +443300437543 or by email!
Question 6) How do I transfer calls on a Siemens Gigaset DX800 all in one VoIP phone?
Answer) There is no default transfer key that comes pre-configured on a Siemens Gigaset DX800 right out of the box. There are however six keys on the far right of the phone that can be configured to any function you like. You need to configure an "R Function" in Gigaset terms to allow a transfer to be made. To do that:
- Press and Hold any one of the "hot" keys on the right-hand side of the phone.
- When the "Function List" appears, scroll down using the silver keys to the right of the keypad, until "R Function" is highlighted. Then either select "OK" or press the button in the middle of the 4 silver keys you just used to navigate, to confirm. The screen will beep and show "Saved" with a tick
Your Transfer function is now ready to use. To transfer a call, you have two choices.
- Attended Transfer (This is where you speak to the person you wish to transfer to first). During a call, press the new "hot" key, you assigned above and dial the extension you wish to transfer to. Wait until they answer the phone, announce the caller and then replace your handset. When you put your handset down, the call will be transferred.
- Unattended Transfer (Pass the call on without announcing it to the recipient first). During a call, press the new "hot" key, you assigned above and dial the extension you wish to transfer to. Once the phone starts ringing replace your handset. When you put your handset down, the call will be transferred.
If you need any further help today, please don't hesitate to contact our friendly support team on +443300437543 or by email!
Question 7) What is a dial plan?
Answer) What is a dial plan?
A dial plan is a set of instructions for Cisco and LinkSys IP phones. It is what allows and restricts the device from making certain calls to certain numbers. They may seem very complicated but when broken down they can become easier to understand. While some dial plans seem very convoluted, there are much simpler plans you can set in order to set up just to do certain things. For example:
All dial plans are entered in brackets like this: ()
This is the dial plan we would recommend for most users, as it allows you to dial anything you wish, whether it be a short code or physical number, international numbers included:
(*x.|x.)
This indicates that an infinite amount of numbers can be dialled for any short code OR for any number. Let’s break it down:
The x. (asterix) is the button pressed at the beginning of a short code. For example 72 or 74 while the x. means an infinite number of digits can be dialed when dialling a short code. For example: 1, 12, 1234, *12345678 etc
| - The bar/pipe symbol is computer speak for OR.
x. means that any number can be created and that any number can be dialled an infinite number of times. For example: 01234 567890. Even international numbers can be dialled without restriction. For example: 1 800 12345 or 00 123456 78912.
Now what if you wanted to start restricting certain numbers or only call certain numbers like 999 or 111?
This is certainly possible! Another example would be this:
(x99)
This would mean that any number can be dialled that ends in 99 so: 099, 199, 299, 399, 499, 599, 699, 799, 899 and 999.
To restrict numbers being called, square brackets [] are introduced. For example:
([123]11|0|00)
This means that you can dial a certain range of numbers before the digits 11. In this case, you can only dial 111, 211, 311, 0 or 00. You could also write this range as [1-3]
While there are many other constraints and restriction types available, these are just a basic few.
If you need any further help today, please don't hesitate to contact our friendly support team on +443300437543 or by email!
Question 8) Why does overlapping requests appear on my phone?
Answer) Overlapping dialling (also known as overlapping requests) is a mechanism integrated in all phones, not just IP phones. It mostly happens when a user dials a number too fast and so the phone is always trying to catch up on itself. This is mostly due to the way the dial plan is configured.
If you are unsure about dial plans, head to this link for more information:
What is a dial plan?
The request part of this question is where the dial plan you have configured is trying to do too many requests at once. For example:
(1xxx[2-9]xxxxxxS0|xxxxxxxxxxxx.)
Lets take this American style dial plan and break it down.
1xxx = the international code for America plus any 3 numbers after.
[2-9xxxxxxS0|xxxxxxxxxxxx] - any range of numbers after between 2 and 9 for up to 6 digits and then immediately send OR look for a 12 digit number.
The S0 supersedes the 12 digit part of this plan and means that it will dial out the 6 digits before looking for the 12 digit string.
So for overlapping requests to take effect with the above string, it would be because your phone has immediately dialled the American part of the dial plan and didn't give the phone a chance to look for the 12 digit part of the dial plan. In other words, if you have a 12 digit number you would like to send that begins with 1 and you intend to dial the whole number which is longer than 10 digits, the overlapping requests will appear. This can be prevented by changing the dial plan to a simpler version of a dial plan, which will reduce this issue.
If you need any further help today, please don't hesitate to contact our friendly support team on +443300437543 or by email!
Question 9) How do I register a Yealink W52 handset to the base?
Answer) In order to use a Yealink W52 handset with your Yealink base, you'll first have to pair it to your base. To do this:
- Long press the button on the base station. The registration LED slow flashes, indicating the base station is in registration mode.
- Press OK on the handset to enter the main menu.
- Select Registration > Register Handset. The LCD screen then displays Base 1 - Base 4.
- Press the arrow keys to highlight the desired one, and then press the OK soft key. The handset begins to search for the base station.
- Press the OK soft key when the LCD screen displays the RFPI code of the base station.
- Enter the system PIN (default: 0000)
- Press Done. The handset plays a successful tone and prompts “Handset Subscribed”, which indicates the handset is registered successfully. After successful registration, an internal handset number and handset name appear on the LCD screen.
If you need any further help today, please don't hesitate to contact our friendly support team on +443300437543 or by email!
Question 10) How do I set up BLF on my Cisco 8861?
Answer) You'll have to update your Cisco to the latest firmware first (10.4.1 SR2 or higher) - which is done via downloading the firmware from a TFTP server. Without the latest firmware, these options won't appear!
The syntax you'll need is fnc=blf+sd;sub=extension number@$PROXY;ext=extension name@$PROXY
For example - if Bob was extension 1001, the syntax would look like this: fnc=blf+sd;sub=1001@$PROXY;ext=Bob@$PROXY
Once you click Save changes, you'll then see it light up on your 8861 if done correctly! If not, then check the syntax and the extensions you have entered and try again!
If you need any further help today, please don't hesitate to contact our friendly support team on +443300437543 or by email!
Question 11) How do I factory reset a Snom 300 or 320?
Answer) In order to factory reset a Snom 300 or 320 via the phone interface, go through the following steps below:
- Press "Navigation" down to enter the "Settings" menu.
- Scroll down to "Configuration".
- Press "Confirm" button.
- Scroll down to "Reset".
- Press "Confirm" button.
- Press button under "Reset" on display.
- Enter the administrator password then press "Confirm" button.
Since firmware version 8.7.3.7 on the Snom 3xx Series it has also been possible to reset the phone using the key pad by pressing the following key sequence:
- Volume Up * Volume Down #
If you need any further help today, please don't hesitate to contact our friendly support team on +443300437543 or by email!
Question 12) How do I factory reset a Snom 360 or 370?
Answer) In order to factory reset a Snom 360 or 370 via the phone interface, go through the following steps below:
- Press "Settings" button to enter the "Settings" menu.
- Press 10 for "Maintenance" menu.
- Press 5 for "Reset Values".
- Press "Confirm" button.
- Enter the administrator password then press "Confirm" button.
Since firmware version 8.7.3.7 on the Snom 3xx Series it has also been possible to reset the phone using the key pad by pressing the following key sequence:
- Volume Up * Volume Down #
If you need any further help today, please don't hesitate to contact our friendly support team on +443300437543 or by email!
Question 13) How do I factory reset a Snom 710?
Answer) In order to factory reset a Snom 710 via the phone interface, go through the following steps below:
- Press button under "Setting" on display.
- Press 5 for "Maintenance" menu.
- Press 4 for "Reset Values".
- Enter the administrator password then press "Confirm" button.
Since firmware version 8.7.3.7 on the Snom 7xx Series it has also been possible to reset the phone using the key pad by pressing the following key sequence:
- Volume Up * Volume Down #
If you need any further help today, please don't hesitate to contact our friendly support team on +443300437543 or by email!
Question 14) How do I disable ghost calls on an OBIHAI OBi 10XX Series IP phone?
Answer) To disable Ghost calls on an Obihai IP phone, you will need to access the Web User Interface, by typing its IP address into your browser. Make sure your computer is on the same network as the phone!
The default login for the user interface is:
Username: admin
Password: admin
Once you are online, navigate to Voice Services > SP ’X’ Service.
From here, you’ll need to change X_InboundCallRoute to:
{(?|@|@@|@@@|@@@@|@@@@@|@@@@@@):},{ph}
You will also need to change the X_UserAgentPort to a number other than 5060.
You can see a list of possible ports here, to check they don’t conflict with other services on your network.
Change the following settings to disable Ghost Calls
If you need any further help today, please don't hesitate to contact our friendly support team on +443300437543 or by email!
Question 15) Why aren't short codes working on my Grandstream phone?
Answer) Most Grandstream phones are pre configured with their own short codes enabled already. This conflicts with the shortcodes set through your Dashboard, and can cause them to fail!
If you are using the GXP 21XX series phones:
You will need to disable Local Call Features in your phone’s Web User Interface, accessed by typing it’s IP address in to your browser. To get the IP of your handset simply go into the Menu on your phone, select Status, Network Status and you'll find the IPv4 address. The default Username/Password is admin/admin.
Once logged in, you’ll need to head to Accounts > Account 1 > Feature Codes > Click ‘No’ on Enable Local Call Features.
If you are using the GXP 16XX series phones:
You will need to disable Local Call Features in your phone’s Web User Interface, accessed by typing it’s IP address in to your browser. The default Username/Password is admin/admin.
Once logged in, you’ll need to go to Accounts > Account 1 > Call Settings, and click ‘No’ on Enable Local Call Features.
Don’t forget to Save and Apply changes!
If you need any further help today, please don't hesitate to contact our friendly support team on +443300437543 or by email!
Question 16) How do I transfer calls on a Grandstream phone?
Answer) There are two ways to transfer calls, namely Attended and Blind transfers.
Attended Transfers:
These are particularly handy when you need to speak to the transferee first (e.g.”John Smith is on the line, do you want me to put him through?”).
Step 1 - Place the caller on hold.
Step 2 - Establish a second call (to the person you want to transfer the call to) by pressing the second line on the phone and calling their extension/number.
Step 3 - Transfer the original call from Line 1 to Line 2, by clicking the ‘transfer’ button and then the 'Line 1' button.
If successful, the calls will end on your phone, and simply connect together!
Blind Transfers:
These transfers simply put the caller straight through to the destination, without having to speak with them first. The transferee’s phone will ring, and when they pick up they will be connected straight to the original caller.
Step 1 - Press the either the transfer button, or the soft ‘transfer’ key on the screen.
Step 2 - Dial the extension/number you wish to transfer the call to.
Step 3 - Press either the transfer button, or the soft ‘blind transfer’ key on the screen.
If you need any further help today, please don't hesitate to contact our friendly support team on +443300437543 or by email!
Question 17) How can I disable ghost calls on Grandstream GXP16xx or GXP21xx Series IP phones?
Answer)
Step 1 - Access the Web GUI for the phones - You can do this by logging onto the IP address of the phones, on the GXP21xx series you can press the up arrow to get the IP address or press the "NextScr" button on the GXP16xx series. You can also use Advanced IP scanner to get the IP address. Once you have the IP address, you can type this into a browser to access the phone. Once you’re here, you’ll need to log in, the default username is admin and the default password is also admin.
Step 2 - Under Accounts (Account 1 is the default), go to SIP Settings > Security Settings.
Step 3 - Enable the option for “Accept Incoming from SIP Proxy Only". This then should stop any ghost calls coming through to your Grandstream!
| If you need any further help today, please don't hesitate to contact our friendly support team on +443300437543! |
|---|
::info()
Question 18) How can I set up BLF on a Yealink T series IP phone?
Answer) Getting BLF set up on a Yealink T-series IP phones is nice and simple! It only requires a few settings, and they'll all easy to get to!
First you'll need the IPv4 address of the device, to get this you can press the enu icon, then selecting Status - the IPv4 address is what you'll need - or you can use a tool called Advanced IP scanner - this will scan your local network and get the IP address of any devices there.
- Step 1
Once you have the IP address, type this in to your browser and you'll be presented with a login page. The default username is admin and the default password is also admin
- Step 2
Once you're in the device, navigate to "Dsskey". In here you'll be presented with a number of line keys - you should leave the first few lines open as this will ensure you have multiple lines available to make and receive calls.
- Step 3
Under the "Type" column, select "BLF". The value is the extension number you want to monitor, the label is what you'd like to appear on the phone and the line is the default line to call it from if you use the speed dial function of the BLF (By pressing it to call them).
If you need any further help today, please don't hesitate to contact our friendly support team on +443300437543 or by email!
Question 19) How can I stop ghost calls on my Polycom phone?
Answer) If you've been receiving calls from an abnormal caller ID, and when you pick up there is nobody there you may be subject to something called a 'Ghost Call'. Our FAQ which goes into more detail on that, however, this FAQ will walk you through disabling Ghost calls on a Polycom business VoIP device.
You'll first need to access the IP address of the phone. To do that, you can either navigate through the settings to Status > Network > TCP/IP Parameters, or you can use one of the IP scanners listed below:
Advanced IP scanner for Windows
Once you have the IP address, enter it in to your browser with the https:// before the IP address - this is due to the certificates Polycom have on their phones. You'll need to trust the site to access it, this isn't harmful it's just the browser won't recognise the certificates used. You can then use the default password 456 to enter the admin control panel.
You'll need to export the configuration of the phone by going to Utilities > Import and Export Configuration. Go to Export Configuration, and export "All Configuration (except Device Settings)
From here you'll need to edit the config in a Text Editor (Mac) or Notepad (PC). You'll need to add the below 2 lines in specifically, right at the bottom of the page, before the "/>", as in the screenshot above.
voIpProt.SIP.requestValidation.1.method="source"
voIpProt.SIP.requestValidation.1.request="INVITE"
Once you've done this, you'll be able to go back to the settings page, and upload the config file you amended. Once completed, you should find the ghost calls will stop affecting your Polycom!
If you need any further help today, please don't hesitate to contact our friendly support team on +443300437543 or by email!
Question 20) Why can't I access the web Interface of my Polycom?
Answer) Some Polycom We Interface's can only be reached through HTTPS, whereas some won't allow access to the Web Interface at all. This is because Polycom introduced the option to utilize only HTTPS, or to disable the Web Interface entirely. Not to worry though, there is a way to switch this back on!
- Step 1
Select Settings
- Step 2
Select Advanced
- Step 3
Enter the admin password (by default this is 456)
- Step 4
Select Administration Settings
- Step 5
Select Web Server Configuration
- Step 6
This menu will either allow you to either only enable HTTP, or only HTTPS or both
Or to disable this again
If you need any further help today, please don't hesitate to contact our friendly support team on +443300437543 or by email!
Question 21) How do I factory reset my Polycom handset?
Answer) In order to factory reset a Polycom handset via the phone interface, go through the following steps below:
- Press the Menu or Home button
- Select Settings > Advanced. The default admin password is 456
- Select Administration Settings
- Select Reset to Default
- Select Reset to Factory
- Select Yes to confirm
Wait for the phone to reboot. Once done, the device will be reset back to factory settings.
If you don't know the phone's password, then you can use the MAC address, by following the steps below:
- Power off the phone by unplugging the power or network
- Plug the phone back in
- Wait until you see Cancel, then press Cancel button
- Quickly press and hold down the following keys:
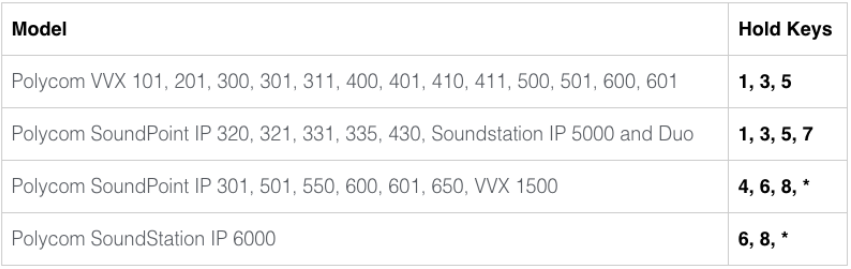
If you need any further help today, please don't hesitate to contact our friendly support team on +443300437543 or by email!
Question 22) How do I turn off ghost calling on a Grandstream HandyTone adaptor?
Answer) If you are experiencing ghost calls on a Grandstream HandyTone Adaptor you can follow the steps below in order to prevent this from happening.
-
Find the IP address of the device. To do this, you will need a computer that is connected to the same network the VOIP adaptor is connected to. The best way to do this would be to run an IP scanner on the network in order to find the IP address of the adaptor. One such IP scanner can be found here for Windows or here for Mac.
-
Once you have the IP address you just need to copy this, paste it into the URL search bar on your browser and hit enter.
-
Once you do that you should be greeted with this page:
The default username and password should both be: admin
-
Once logged in, click on FXS port on the top-right menu.
-
About halfway down the page, enable the following setting to only allow calls to be received from the SIP proxy
-
Scroll All the way to the bottom and click on the "Update" button at the bottom of the form.
A couple of notes in regards to this. You need to access this page on a computer that is on the same network as the phone. Additionally, these changes must be saved when the phone is NOT engaged on a call.
If you need any further help today, please don't hesitate to contact our friendly support team on +443300437543 or by email!